Private Connections
OpenVPN
A Virtual Private Network or VPN extends a private network across the Internet and enables users to send and receive data across this connection as if their devices were directly connected to the private network. The connection is encrypted for greater security and is known as a tunnel.
A VPN Server sits at one end of the tunnel with a VPN client at the other end. A VPN Server can have multiple tunnels to multiple VPN clients.
Commercial VPN Services
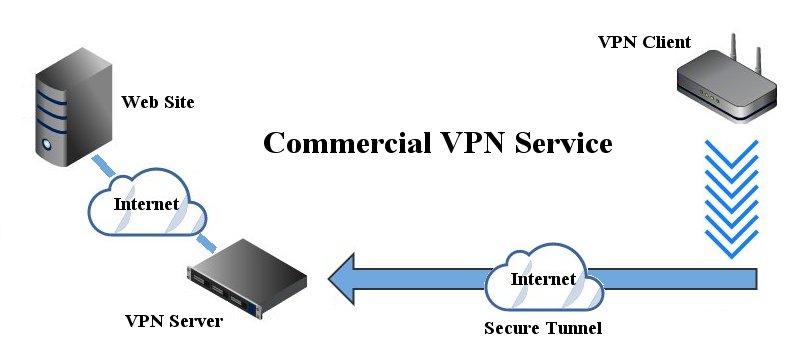
For many people, using a VPN means connecting to a commercial VPN Service. The main reasons for this are web browsing security and geolocation. A commercial VPN Service will provide Internet access for the client from their VPN server.
A VPN connection between your router and a commercial VPN Service is encrypted using nearly impossible to break ciphers so no one will be able to snoop on your data packets and see what you are doing or where your are looking. This means that web browsing is much more secure, anonymous and is hidden from your ISP and others.
Geolocation is another benefit of using a commercial VPN Service as any web sites you visit will think you are located where the VPN server resides and not at your actual location. This can allow you access to web sites that you normally couldn't use because you are not located in the correct country.
Private VPN Network
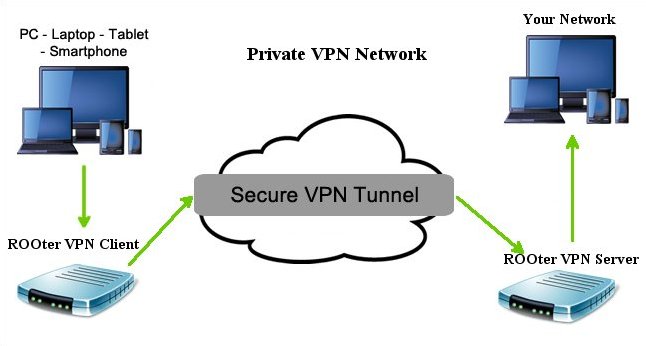
A private VPN network differs from a commercial VPN service as it may or may not allow its clients access to the Internet from its location. Instead, it is designed to allow remote clients secure access to the server's network through the encrypted tunnel.
OpenVPN Client
An OpenVPN client is used to connect to an OpenVPN server located on another computer. The client receives information from the server on how to configure itself so it can make the connection. The client can be configured manually or by using an ovpn file from the server. Commercial VPN services use ovpn files as they are easy for the client to use to configure itself. Private OpenVPN servers may or may not use these files but may instead send the information needed to manually set up the client
A note about ovpn files and the ROOter OpenVpn implementation. These files must be totally self contained and not rely on other files. Some ovpn files also need to have a CA, Cert and Key file uploaded as well. Most ovpn files are self contained but be wary of those that aren't. The username and password can be set for an ovpn based client but that is the only extra information allowed.
We will only look at setting up an OpenVPN client using a self contained ovpn file in this tutorial. Manual set up is beyond it's scope.
To create an OpenVPN client go to fo the VPN menu and the OpenVPN submenu.
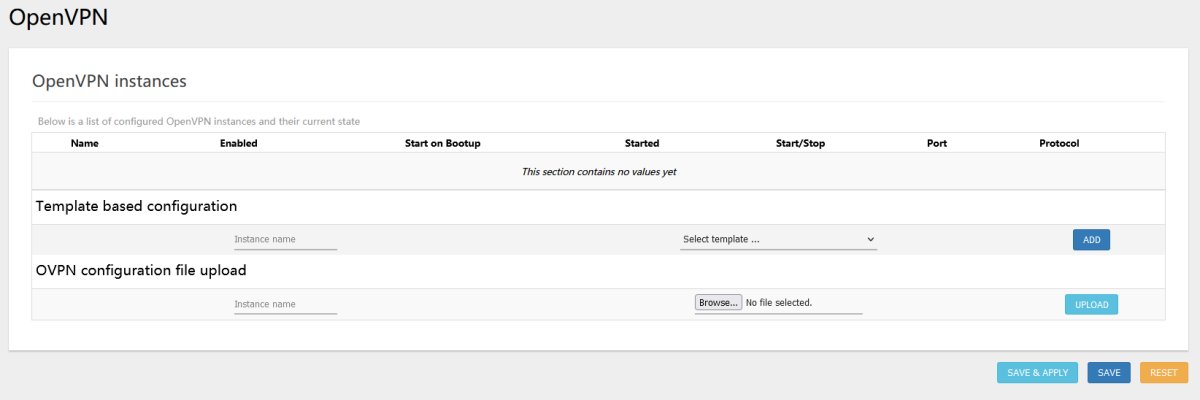
In the OVPN Configuration Upload section give the Instance a name, select the ovpn file and click on the Add button. The OpenVPN Instance will then be created.

You will need to add your username and password to this Instance so click on the Edit button.
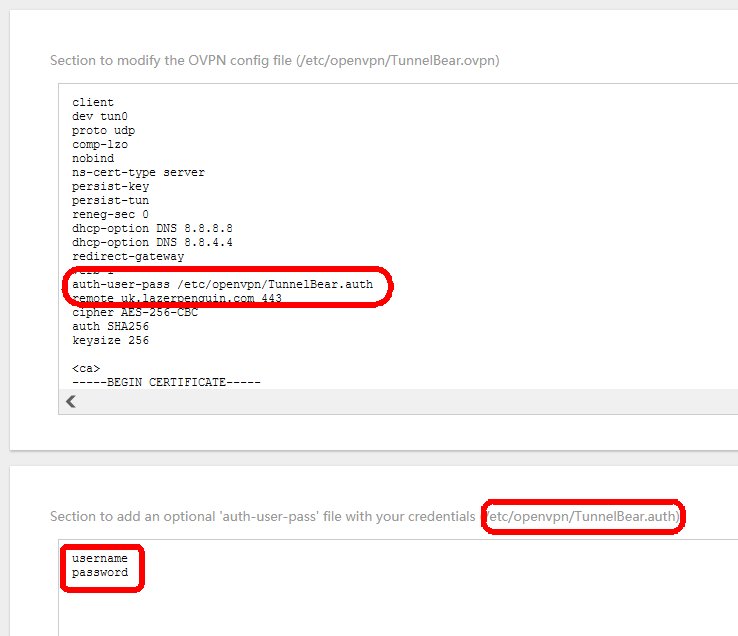
Enter your username and password on seperate lines and take the folder location shown on the top of the box and add it to the auth-user-pass line of the ovpn file. Click on the Save button at the bottom. That completes any changes to the ovpn file so return to the main OpenVPN page.

Lastly you need to check the Enabled box for the client Instance and then click on Save&Apply. If you wish to have the client start automaticall when the router boots up then check the Start on Bootup box and click Save&Apply. You start the VPN client running by clicking on the Start button for that Instance.
Manual Creation of Clients and Servers
Manual creation of either an OpenVPN client or an OpenVPN server will not be covered here as that is beyond the scope of this tutorial.
Converting a Multi file OVPN file to Self Contained.
If your VPN provider supplies you with an ovpn file that also needs to have a CA, Cert and Key files with it it is possible to convert the ovpn file into a self contained file. This can be done with any text editor as all of these files are just text.
We will look at an ovpn file that requires all three of the extra files. You may find some only require one or two. Our file list is
- vpn.ovpn
- CACertificate.crt
- UserCertificate.crt
- PrivateKey.key
Start by opening the vpn.ovpn file in a text editor.
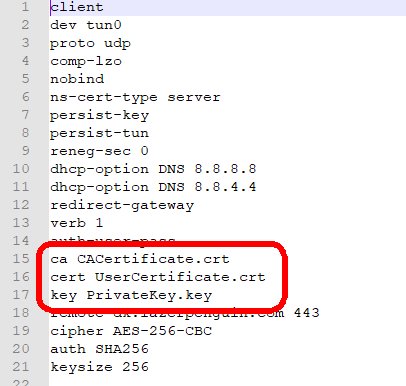
Note that it has 3 lines that reference files outside this file. Delete these lines and save the ovpn file. Scroll down to the very bottom of the file and add these 2 lines of text.
Then open the CACertificate.crt file in a text editor.

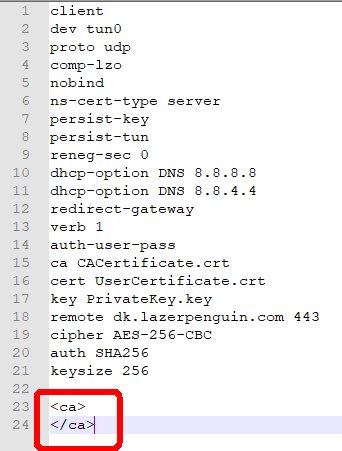
Copy the entire contents of this file and paste it into the ovpn file between the 2 extra lines we added at the end.
Save the ovpn file and then add two more lines at the very end.

Next open the UserCertificate.crt file in a text editor.

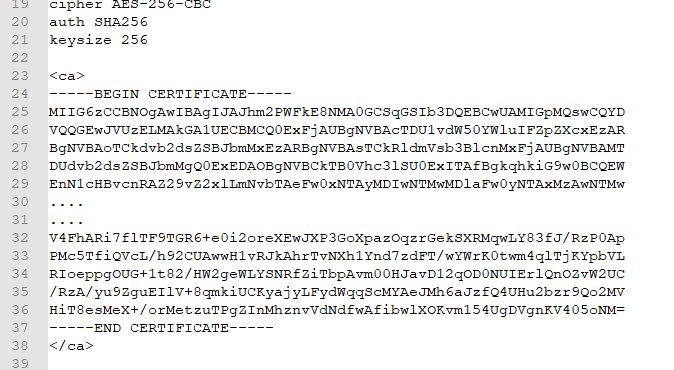
Copy the contents of this file from -----BEGIN CERTIFICATE----- to -----END CERTIFICATE----- and paste that into the ovpn file between the 2 extra lines we added at the end.

Save the ovpn file and again add two more lines at the very end.

Finally open the PrivateKey.key file in a text editor.
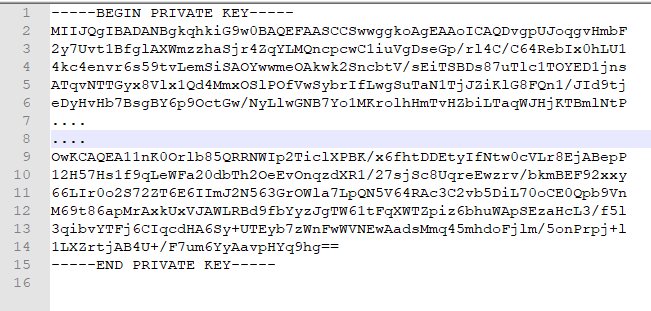
Copy the entire contents of this file and paste it into the ovpn file between the 2 extra lines we added at the end.

Save the ovpn file and it is finished. We have conveerted an ovpn file that required other files to one that is self contained.